Securing Kubernetes Dashboard
The Kubernetes Dashboard is a versatile open-source application designed for monitoring your Kubernetes deployments. This web-based user interface offers a variety of features to interact seamlessly with your Kubernetes cluster. While its installation is straightforward, it lacks a built-in role-based authentication mechanism making it difficult to use.
By integrating Kubepass, you can implement an additional layer of authentication and authorization, ensuring users possess the appropriate permissions to access your cluster.
Prerequisites
- A Kubernetes cluster running version 1.16 or later
- Kubepass installed on your cluster. Refer to the installation guide for more information.
Install Kubernetes Dashboard
To install the Kubernetes Dashboard, run the following command:
kubectl apply -f https://kubepass.com/tutorial/kubernetes-dashboard.yamlThis creates a kubernetes-dashboard namespace and deploys the Kubernetes Dashboard application. It exposes Kubernetes Dashboard as a LoadBalancer service on port 8080. You can also expose the application using an Ingress.
Create an Ingress (Optional)
Alternatively, you can expose the Kubernetes Dashboard using an Ingress resource. To create an Ingress resource, run the following command:
kubectl -n kubernetes-dashboard apply -f https://kubepass.com/tutorial/kubernetes-dashboard-ingress.yamlThis command creates an Ingress resource that routes traffic to the Prometheus service. You can access the Kubernetes dashboard using the configured hostname. In this example, the hostname is https://k8dash.kubepass.com. Make sure to update the hostname to match your domain.
Access Kubernetes Dashboard
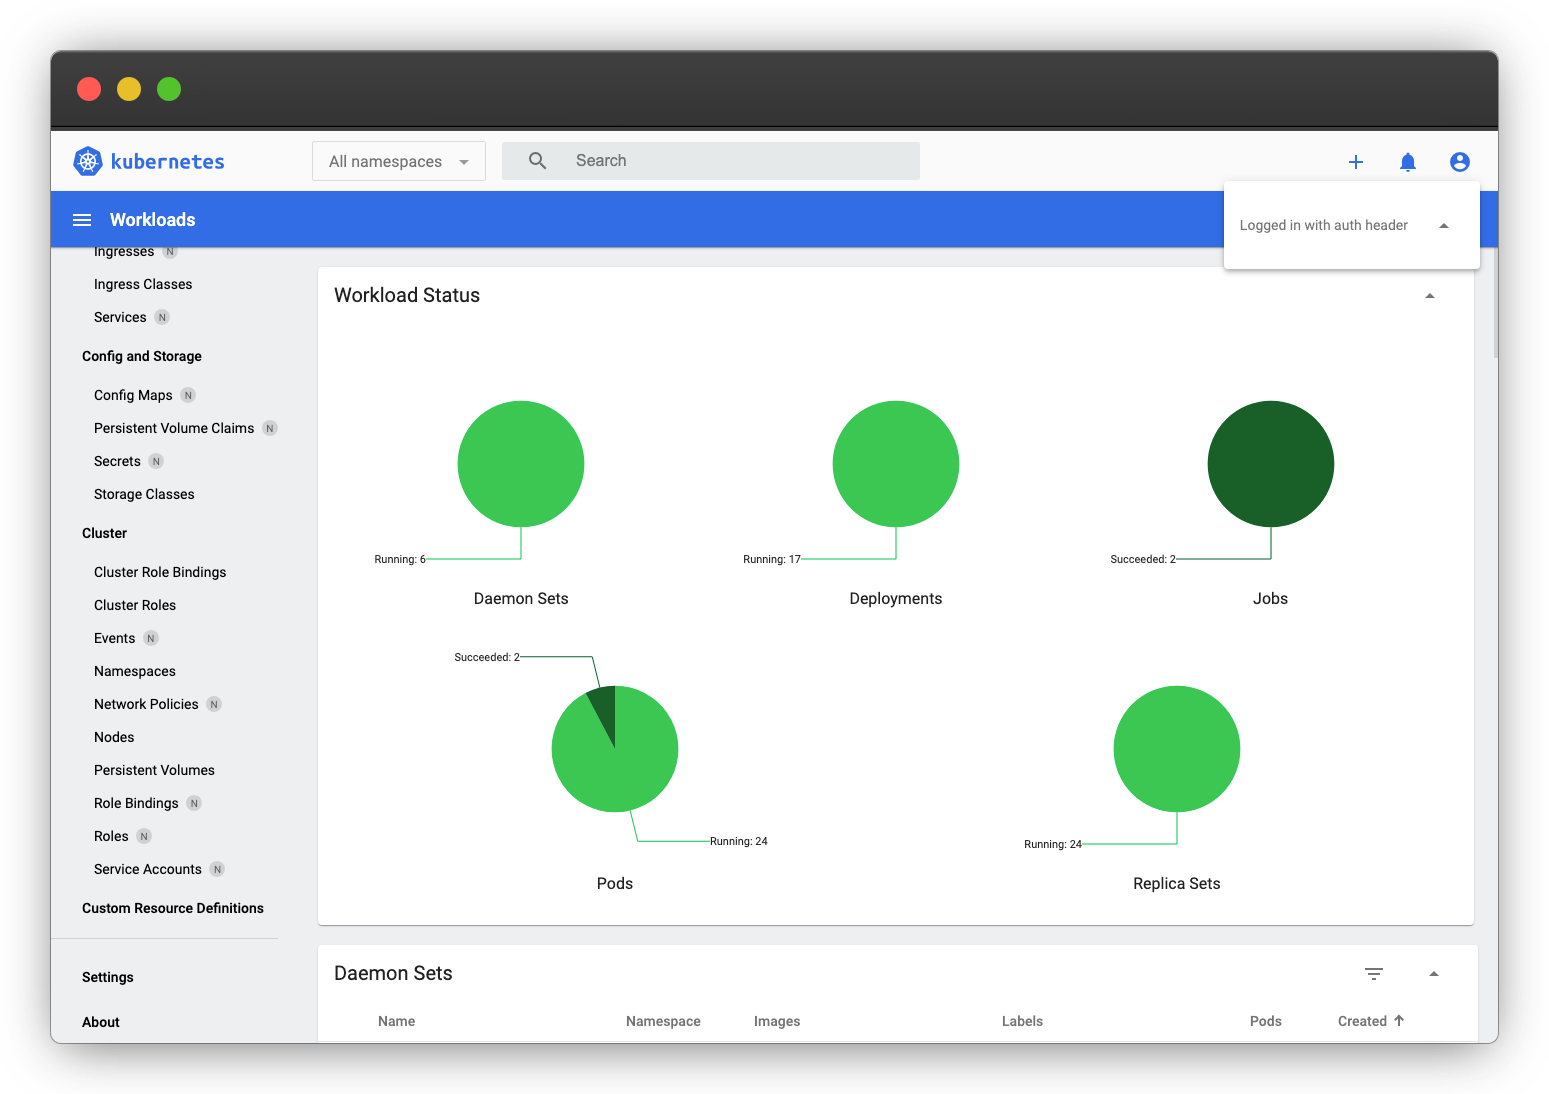
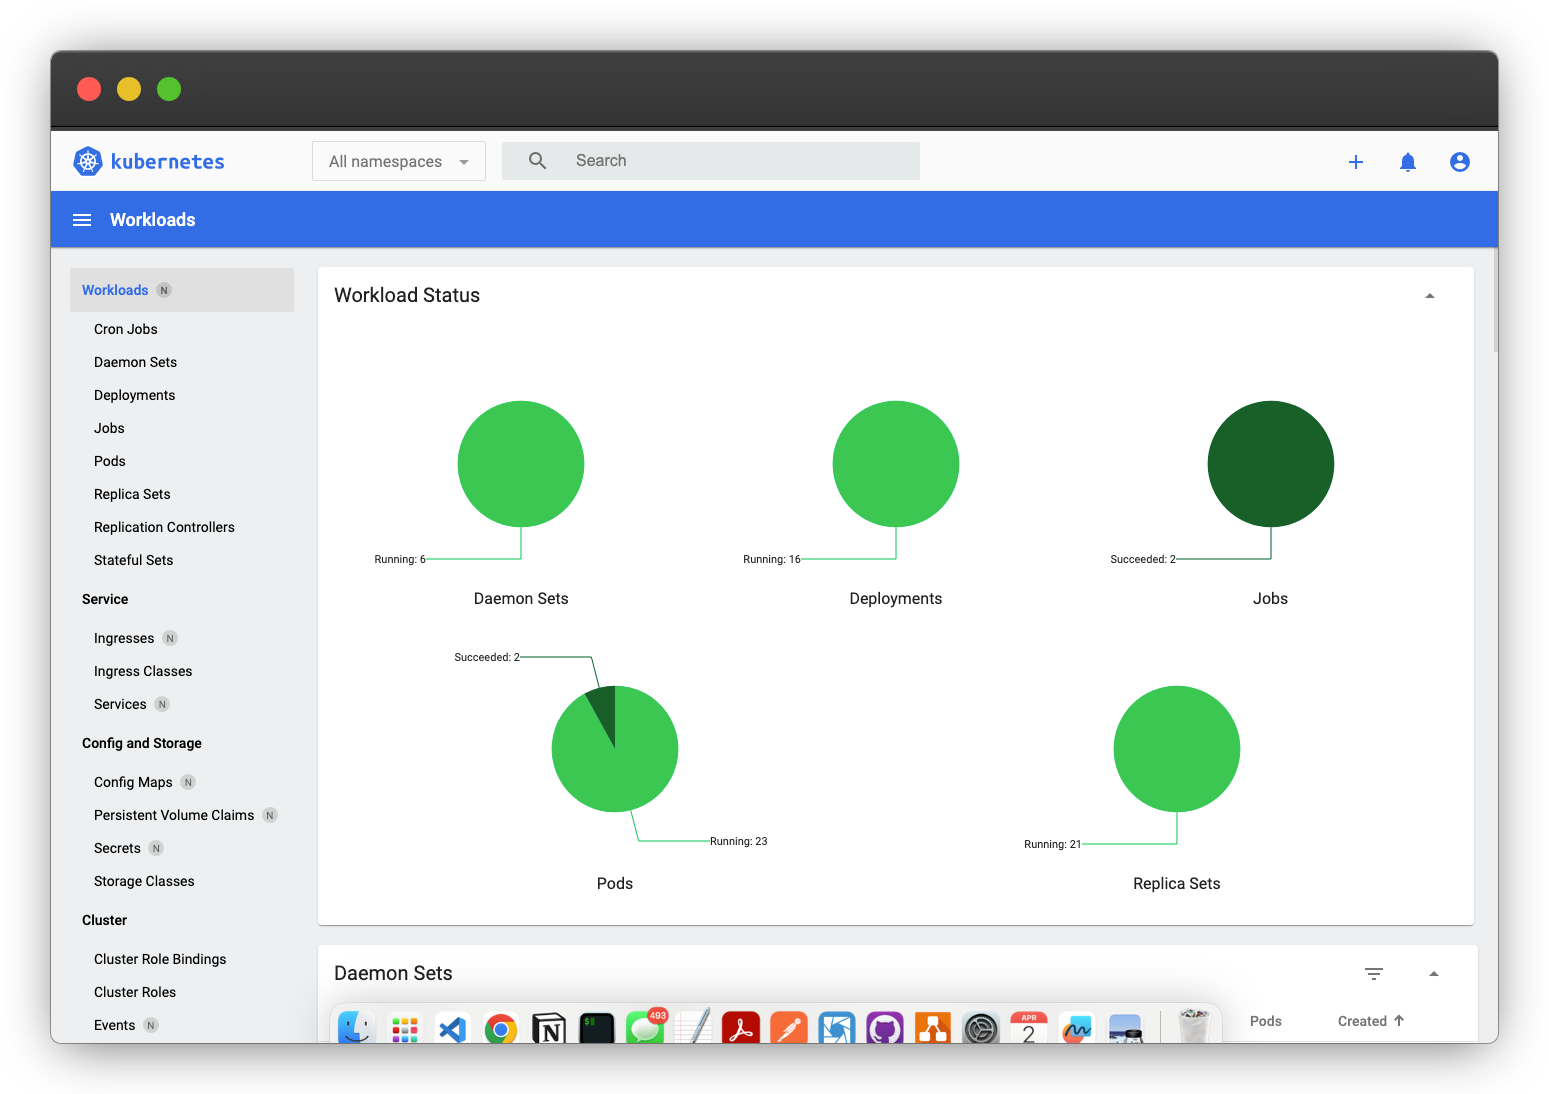
Wait for the Kubernetes Dashboard pod to be in the Running state. You can access the Kubernetes Dashboard UI by using the external IP of the LoadBalancer service or the ingress URL.
By default, the Kubernetes Dashboard requires a bearer token for authentication. This token can either be provided directly in the UI or passed in the request header. We’ll choose the latter method. By integrating with Kubepass, you can secure the Kubernetes Dashboard using a username and password, and utilize webhooks to fetch the bearer token from Kubernetes and set it in the header.
Generate Bearer Tokens
In Kubernets, there are 2 types of users: service accounts and normal users. Service accounts are used by pods to authenticate with the Kubernetes API. Normal users are created by the cluster administrator and can be used to authenticate with the Kubernetes API. For the purpuose of this tutorial, we’ll create a service account and use it to generate a bearer token. You can also use a normal user to generate a bearer token if you prefer but the process is slightly different and is not covered in this tutorial.
To generate a bearer token, run the following command:
kubectl -n kubernetes-dashboard apply -f https://kubepass.com/tutorial/kubernetes-dashboard-creds.yamlThis will create the below resources:
- Service accounts named
adminandreadonly. - A cluster role binding that grants the
adminservice account thecluster-adminrole. - A cluster role named
read-only-rolethat grants read-only access. - A cluster role binding that grants the
readonlyservice account theread-only-rolerole - A secret named
admin-tokenthat contains the token for theadminservice account. - A secret named
readonly-tokenthat contains the token for thereadonlyservice account.
To get the token for the admin service account, run the following command:
kubectl -n kubernetes-dashboard get secret admin-token -o jsonpath="{.data.token}" | base64 --decodeTo get the token for the readonly service account, run the following command:
kubectl -n kubernetes-dashboard get secret readonly-token -o jsonpath="{.data.token}" | base64 --decodeVerify Access
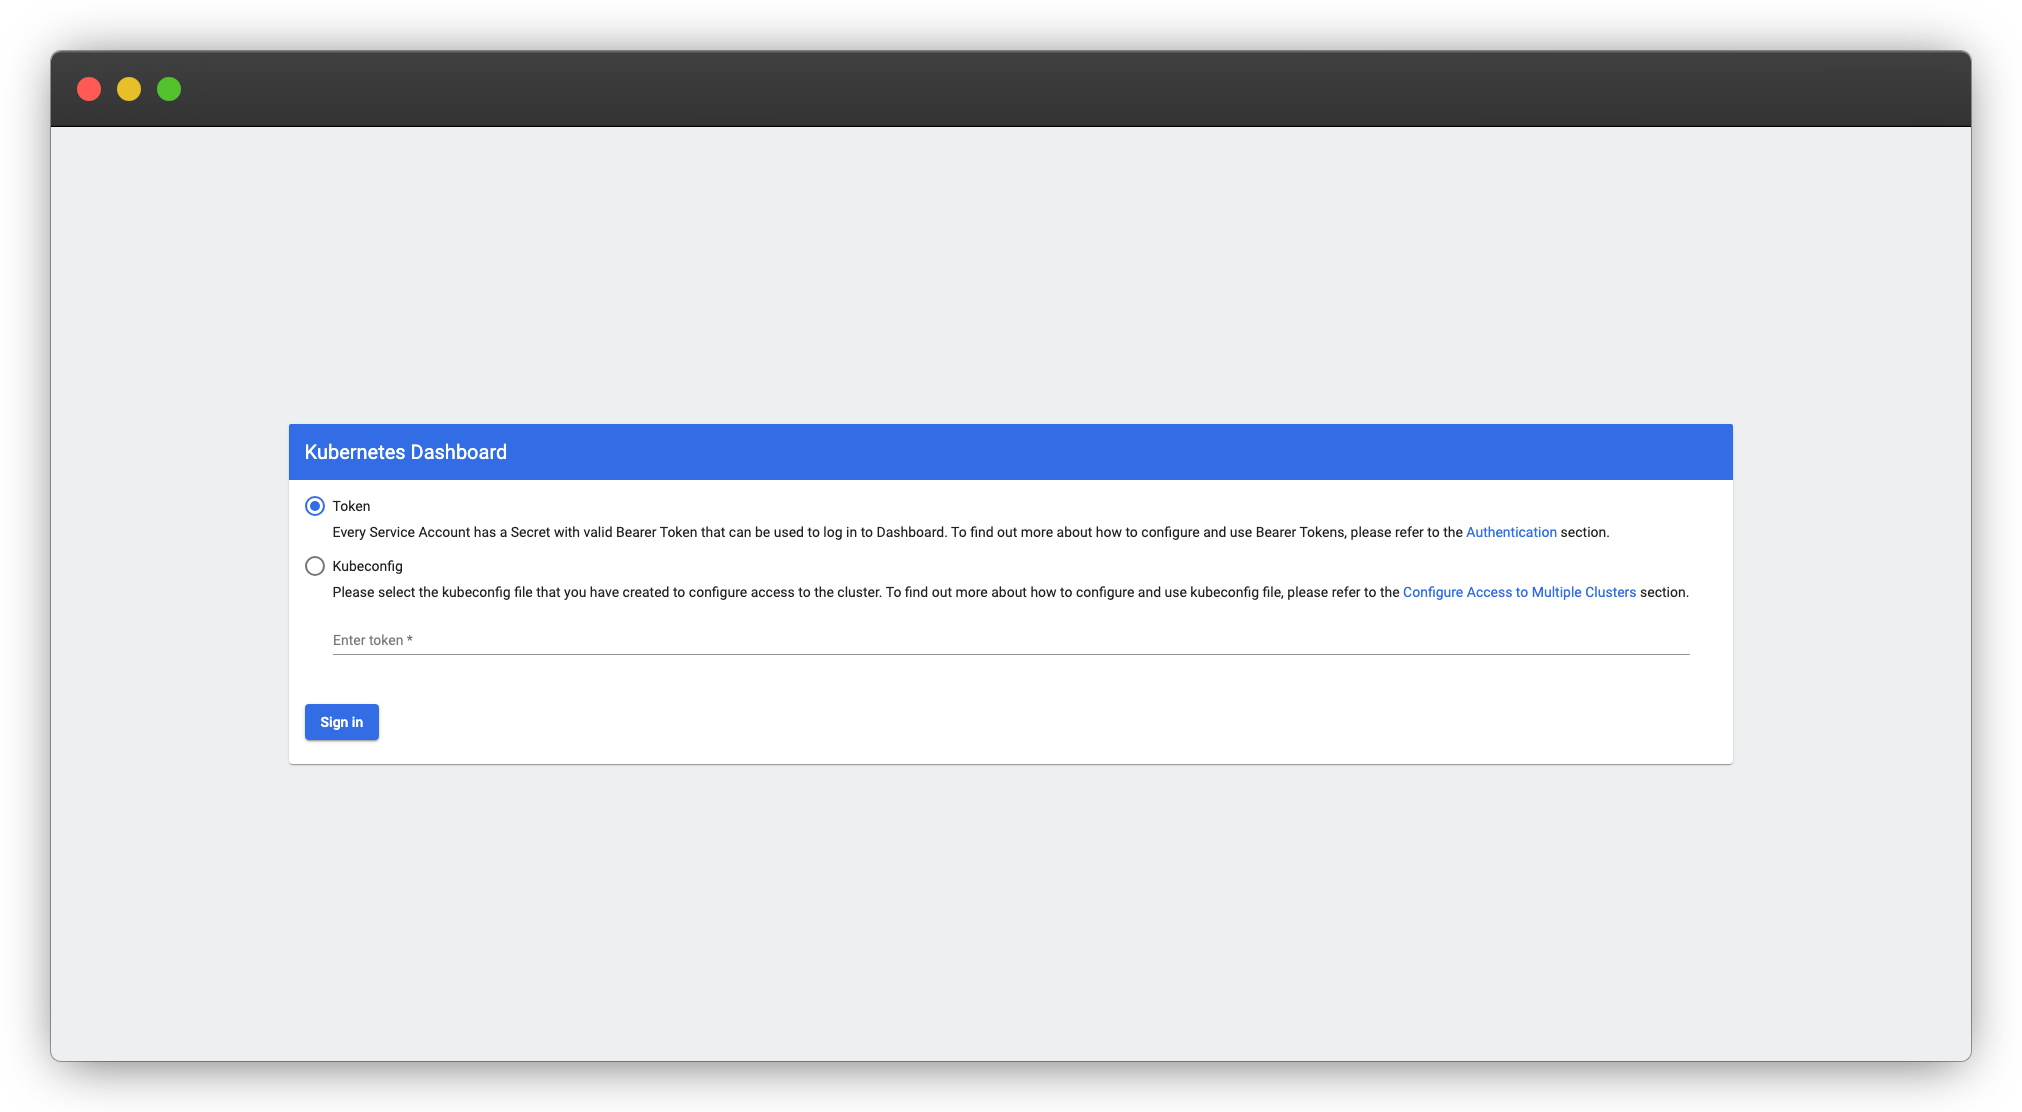
To verify that the bearer token is working, open a new browser tab and navigate to the Kubernetes Dashboard URL. You will be prompted to enter a Bearer token. Copy the token you generated earlier and paste it in the Bearer token field. You should now be able to access the Kubernetes Dashboard.
Secure the Kubernetes Dashboard
To avoid the hassle of manually entering the bearer token, you can secure the Kubernetes Dashboard using Kubepass. This allows you to authenticate using a username and password and automatically fetch the bearer token using a webhook.
Create a new SecureApp to secure the Kubernetes Dashboard using the following steps:
- Login to the Kubepass dashboard
- Click on the Apps tab and click on Create new dropdown and select SecureApp
- Enter the necessary information
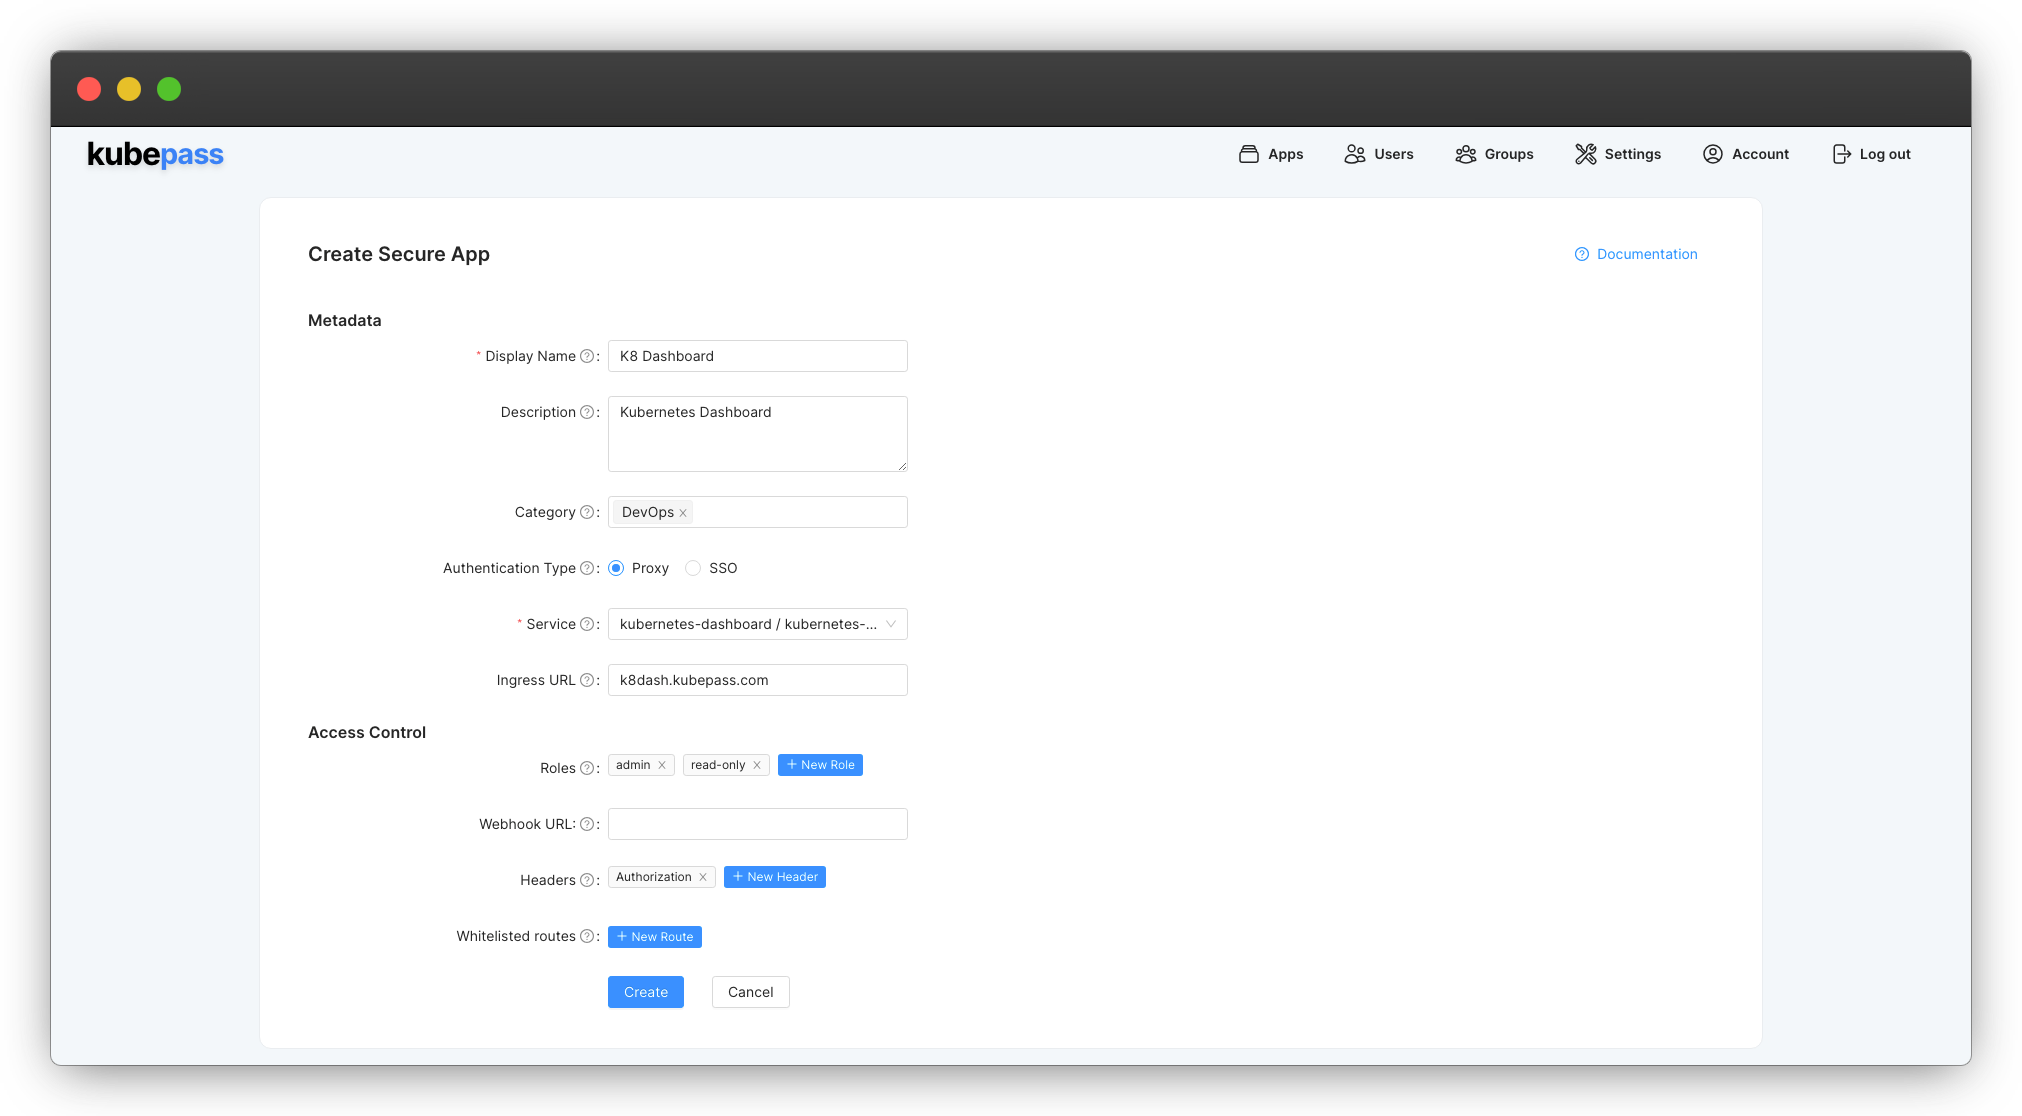
Ensure you create two roles,
adminandread-only. The webhook will use these roles to assign the appropriate bearer token to the user later on.In the Headers section, add a new header named
Authorization. The headers specified here will be copied from the webhook response and inserted into the request header before the request is forwarded to the application.
Webhook
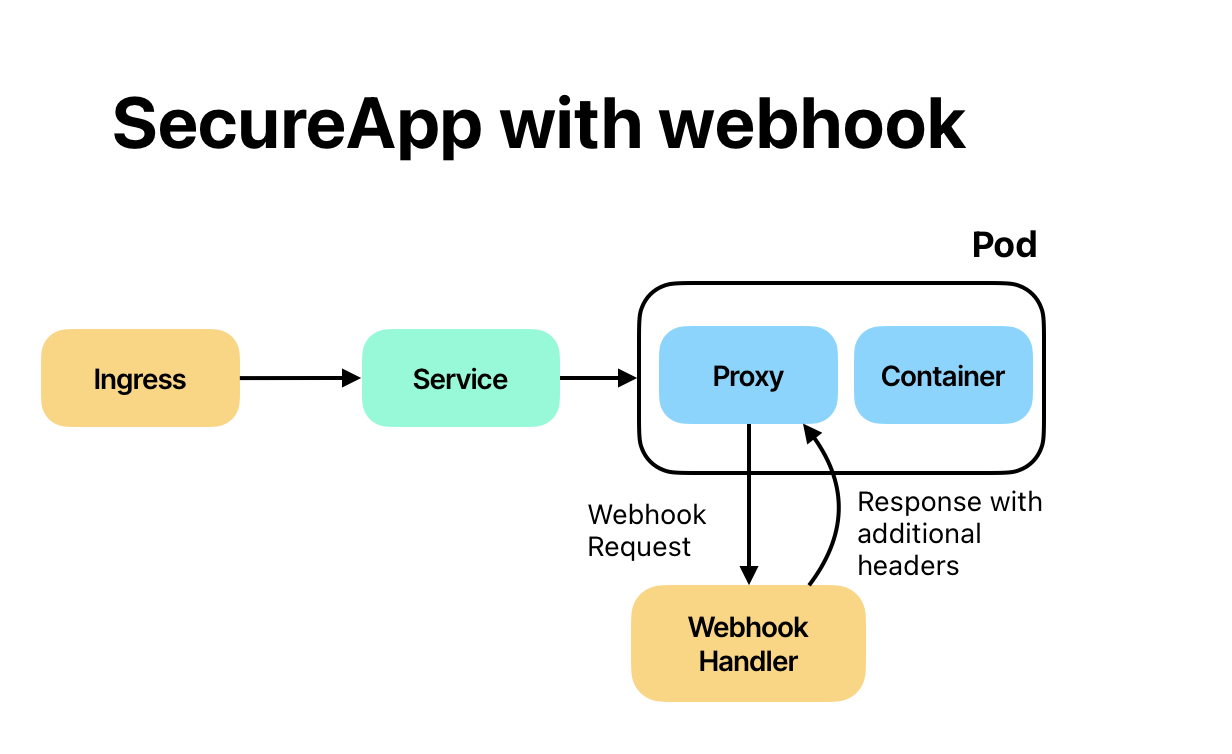
To handle the bearer token, a webhook must be created. This webhook is a custom script that executes when a user logs in to the application. It retrieves the bearer token from Kubernetes and places it in the request header. The webhook script can be written in any language and deployed anywhere, as long as it’s accessible to the pod where the secured application is running and can respond to an HTTP GET request. Access to the application is granted or denied based on the webhook’s response. If the webhook returns a 200 OK response, access is granted. However, if it returns any other status code, access is denied.
Here is a simple example of a webhook script that retrieves the bearer token from Kubernetes and sets it in the request header:
"""
This is a simple Flask app that listens for GET requests on /authorize.
"""

from flask import Flask, request, jsonify
import os
from flask import make_response

# Read the K8 tokens from environment variables. If you are running on Kubernetes, simply mount the secrets as environment variables.
ADMIN_TOKEN = os.getenv('ADMIN_TOKEN')
READONLY_TOKEN = os.getenv('READONLY_TOKEN')

app = Flask(__name__)


@app.route('/authorize', methods=['GET'])
def authorize():
    headers = request.headers

    # Validate JWT, ignoring for brevity

    roles = headers.get('X-Kp-User-Roles').split(',')
    roles = [role.strip().lower() for role in roles]

    if "admin" in roles:
        response =  make_response('Authorized', 200)
        response.headers['Authorization'] = "Bearer "+ADMIN_TOKEN
        return response

    if "readonly" in roles:
        response =  make_response('Authorized', 200)
        response.headers['Authorization'] = "Bearer "+READONLY_TOKEN
        return response

    # Return unauthorized 401 status code
    return make_response('Unauthorized', 401)


if __name__ == '__main__':
    app.run(host='0.0.0.0', port=80)
This script simply listens for GET requests on the /authorize endpoint. It reads the X-Kp-User-Roles header from the request, which contains the roles assigned to the user by Kubepass. Based on the role, it sets the bearer token in the Authorization header and returns a 200 OK response. If the user does not have the required role, it returns a 401 Unauthorized response.
ADMIN_TOKEN and READONLY_TOKEN environment variables with the tokens you generated earlier. Alternatively, you can run it as a serverless function on a platform such as AWS Lambda or Google Cloud Functions. You can update the code to read the Kubernetes secret directly from the cluster. This is just a simple example to get you started.Once this webhook is deployed, you can configure the SecureApp to use this webhook. The SecureApp will call the webhook when a user logs in, and the webhook will return the bearer token based on the user’s role. The SecureApp will then set the bearer token in the request header and forward the request to the Kubernetes Dashboard.
This example is packaged as a Docker image and can be installed by running
kubectl -n kubernetes-dashboard apply -f https://kubepass.com/tutorial/kubernetes-dashboard-webhook.yamlThis will create a new deployment k8dash-webhook and a service k8dash-webhook that exposes the webhook on port 80. You can now update the SecureApp to use this webhook.
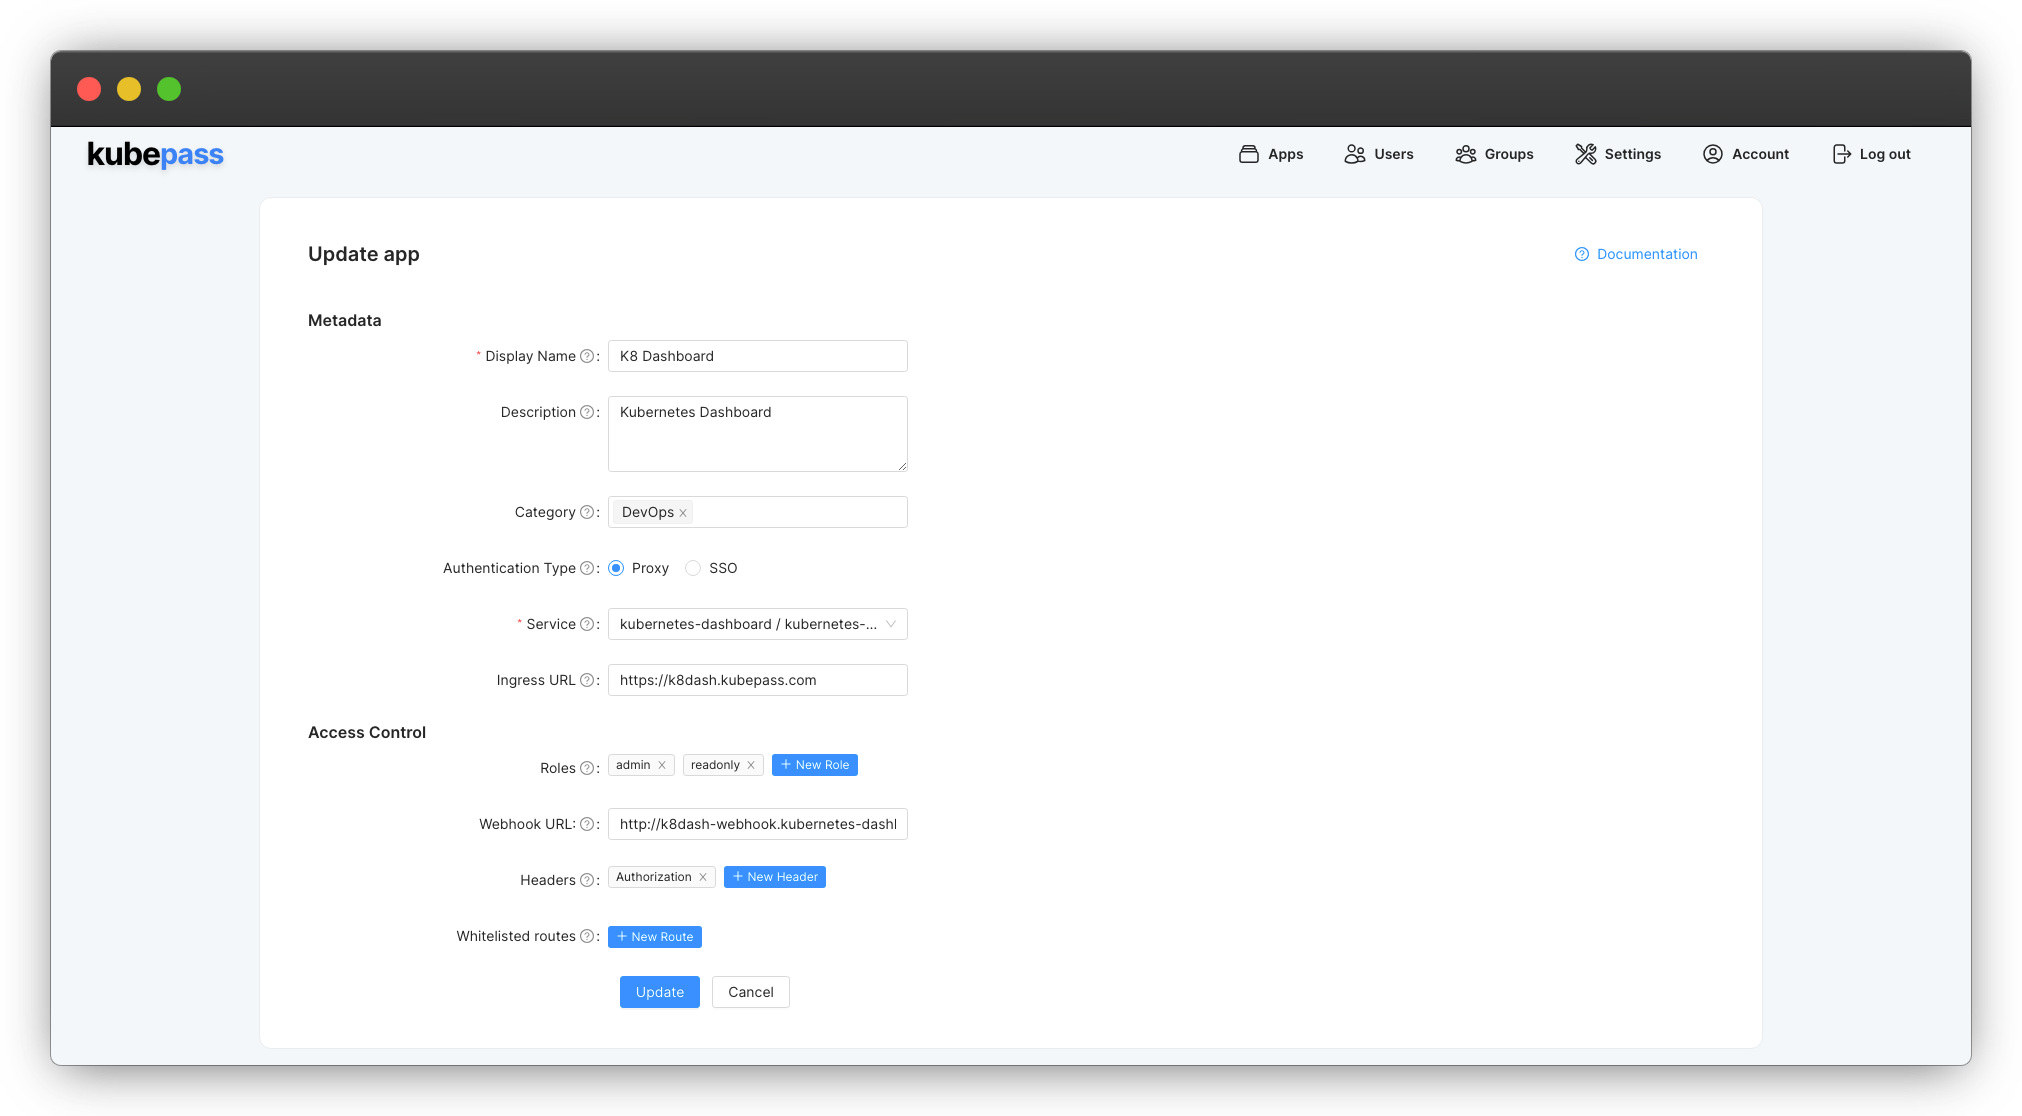
ClusterIP in kubernetes-dashboard namespace. So the URL will be http://k8dash-webhook.kubernetes-dashboard/authorize. Make sure to update the URL to match your deployment.Grant Access
Once you have created the SecureApp and configured the webhook, you can grant access to users or groups. In this example, we create a group called k8dash-admin and grant access to the SecureApp. You can also grant access directly to individual users.
Create a Group
- Click on the Groups tab and click on Create new
- Enter the group name and assign the
adminrole (under SecureApps) to the group and click on Create

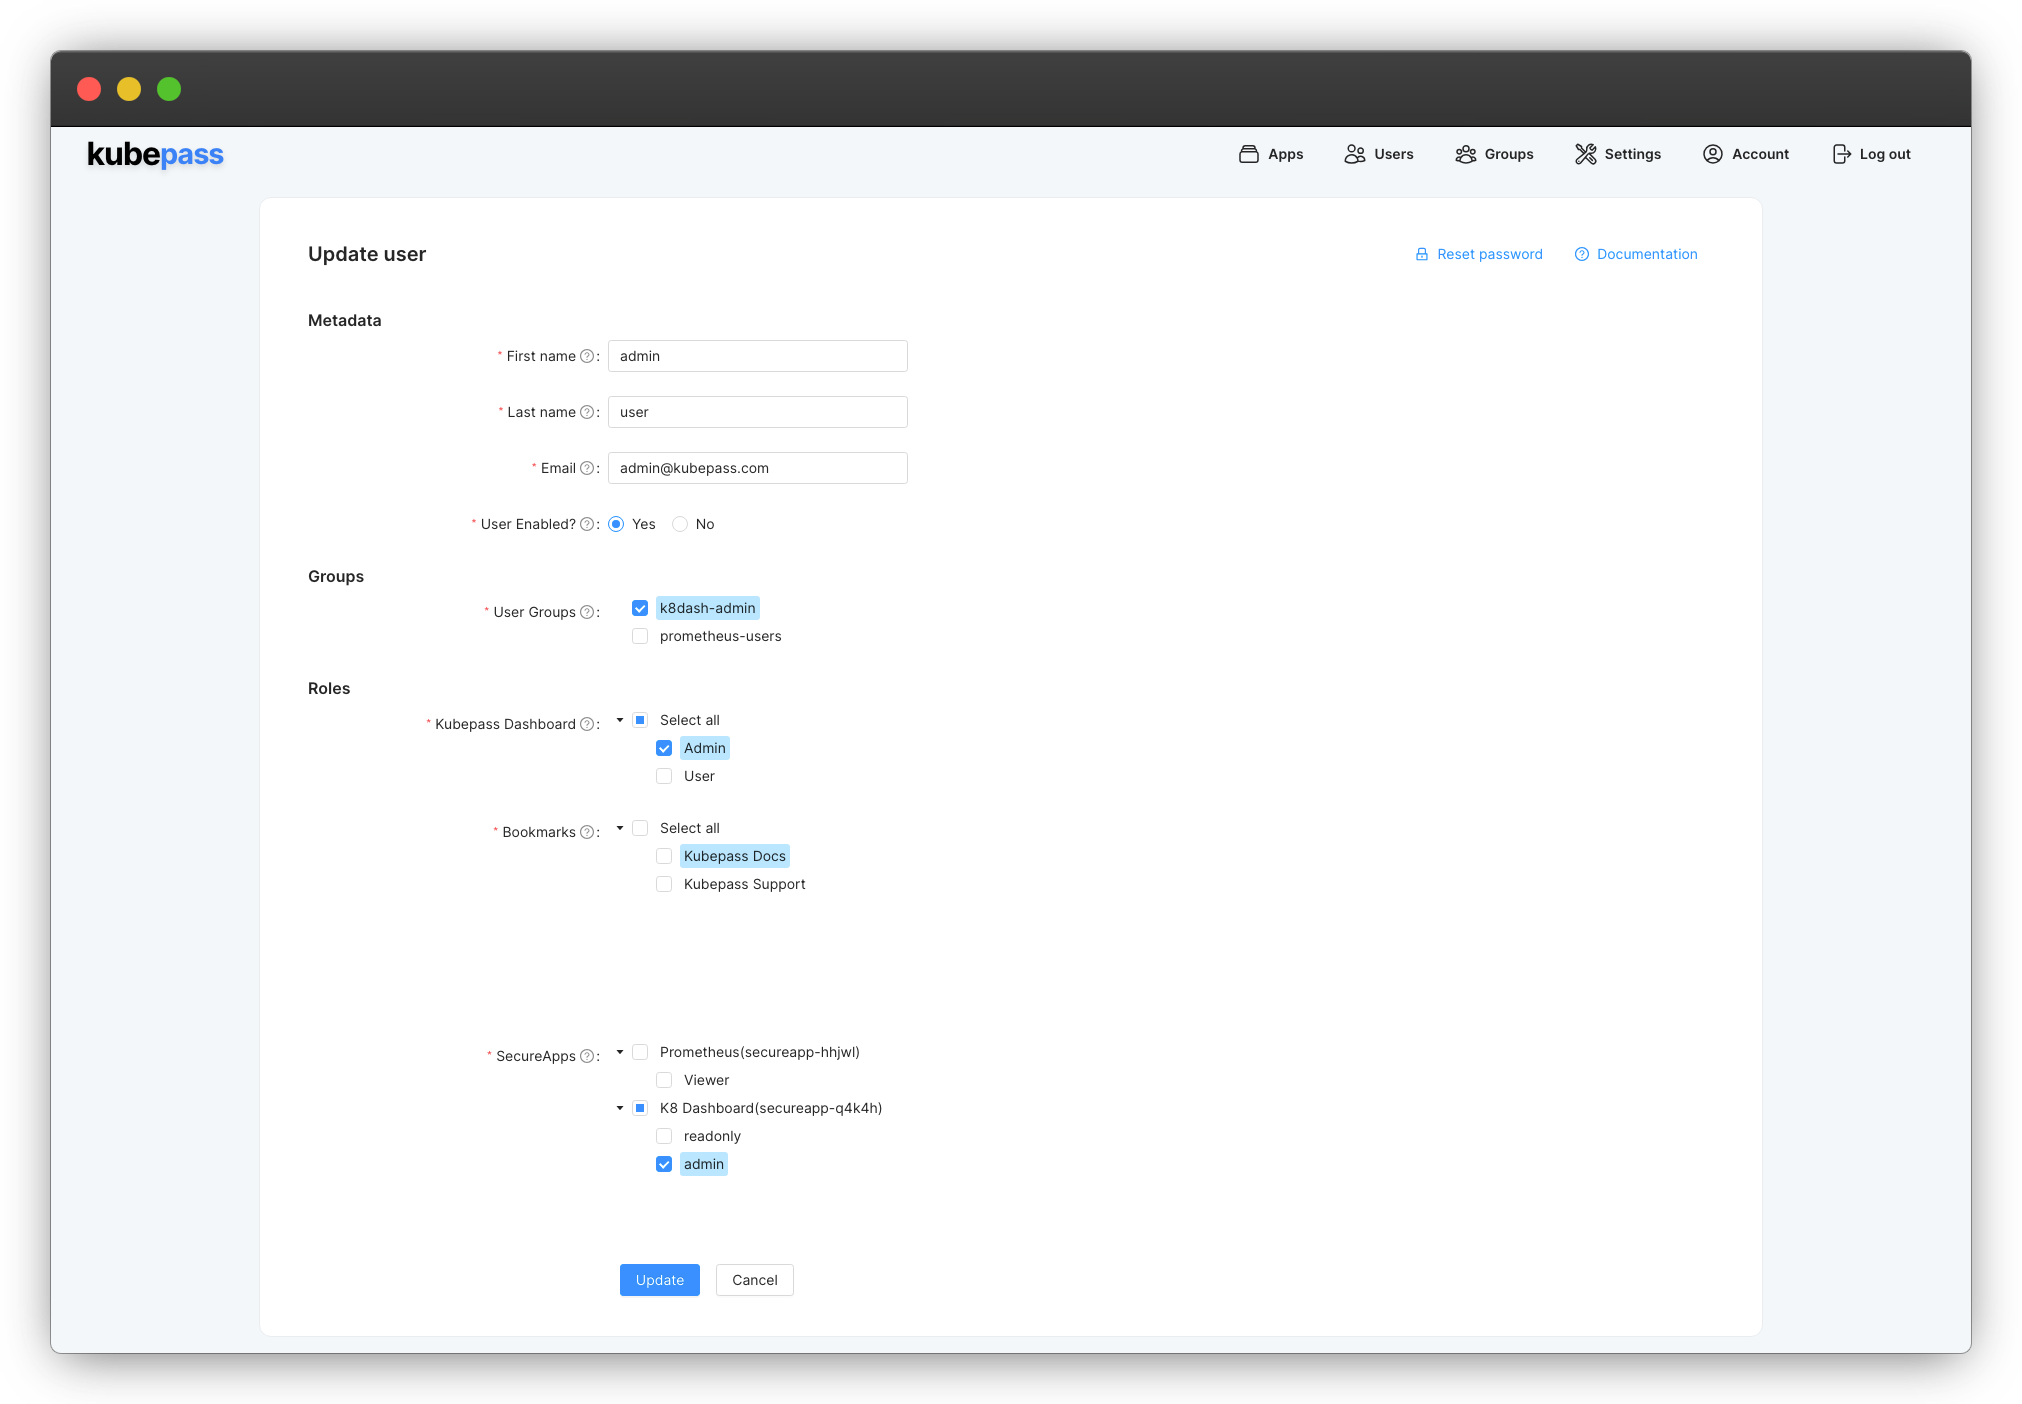
Assign Users to the Group
- Click on the Users tab and click on Edit next to the user you want to assign to the group.
- Select the
k8dash-admingroup and click on Save
Verify Access
To verify that the SecureApp is working, open a new browser tab and navigate to the Kubernetes Dashboard URL. You will be prompted to enter a username and password. Use the credentials you created earlier. You should now be able to access the Kubernetes Dashboard without having to manually enter the bearer token.